these are my reference sheets with measurements.
use them wisely ;)


Day1 - 22/12/14
Had to reread the documentation
on SCRUM to be sure where to start. Decided on writing down the requirements
for this project.
|
Day 2- 23/12/14
Started my requirements for this project,
but it turned into a whole 'product backlog' -talking about everything I want to learn in the long run. Needed to choose and what to do
and further expand on those items. I also worked on the scrum method for
‘time-boxing’ items; so that I’d have an idea how much of the work I could actually
do in 2 weeks.
Started with re-reading Loomis
and doing some of his boxed heads, only with skulls.
 |
Day3- 24/12/14
Chose my list of requirements
for this project. Still not sure how to get those measurements into my head.
Still trying with Loomis and
other techniques.
 |
Day4– 25/12/14
I drew a side-view. Then tried
to do it from memory. It’s not sticking yet. I’m using boxes but for the
positions I really need to cheat.
 |
Day 5 - 26/12/14:
-I’m taking measurements of the
side of the head. I have to Write DOWN the numbers, and make sure they are
PRECISE. I should use STRAIGHT lines with a ruler -not freehand like I have
been doing. I cannot remember numbers if I do not write them down and I
cannot remember the right ones if I am not exact. A bit late to realise but
better now than never.
-I still need to do the front
but I’m still not sure what the best way is to memorize this. Maybe
memorizing the side first would be better. Now I’m deviating to tumblr… still
not sure about the best course of action.
-Read up on study-techniques. The Best for this kind of thing seems to be just to keep repeating. So I’m going to do that, until I can still get it right the next morning. Then some more times to make it stick longer.
  |
Day 6 - 27/12/14
-rehearsing the side-view.
There’s just the nose-bone length and jaw-bone shapes to get right.
-want to do the measurements
for the front view/ en face.
-need to get those measurements
b/f we leave… tight.
(Took the measurements and started copying that evening.)
 |
Day 7 - 28/12/14
Got the measurements for the
front. I’m wondering if I need top/bottom and back too…
Shape simplification is up for
today.
 |
Day 8 - 29/12/14
Nearly have side & front
memorized right. Just a few details. I just found out I cannot draw perfect
squares. They are too wide, and I only notice when I turn the paper.
I want to draw out the shapes,
cranium, eye socket, cheekbone, nose, upper and lower jaw. Have to look into
Hampton and other literature on how.
 |
Day 9 - 30/12/14-
Mistakes I keep making:
side view- I stick the nose-bone out a little
too much. and the back of the jaw a little too low.
front- eyes go up from the center 1/6 not 1/ 12. teeth go lower, to half way and the sparings on the sides of the skull move up on the 1/2 from center line. I sort of have the side/front memorized, but there is something weird going on when lining them up together. I just took 2 good photos of the internet, but front and side view seem to be from a very different shaped skull.
-worked on simplifying the shapes of the jaw.
these are just from memory. then played around with playdough. which is way to soft to get the shape right, but the kids had fun and I think I learned stuff anyway. Finished the shape simplification of the jaw. want to work on the cheekbone next. still coming up short on some good literature on this. suggestions are appreciated :p  |
Day 10 - 31/12/14
Figured out the problem with
the skulls! The front view is of a male, the side of a female. Both quite
prominently so and thus quite different.
I made my own pictures this
time, of my , and have documented the differences between male/female (though
honestly it seems like a lot of generalizing). The important thing is that
front and side view line up right now.
Trying free drawing without ref
for my skull, which I have found out must be a girl. Having trouble figuring
the stuff going /w the eye sockets and inside of the mouth when doing
undersides.
Forgot about doing the back bottom
and top. I’ll have to learn those first I think.
 |
Day 11- 1/1/15
side and front are pretty much memorized. I
still get in trouble when trying out different angles though.
started on the bottom. its a pretty easy one. I changed the scema to match my own skull better; have the chin recede. getting there..
if im sure I have the bottom memorized gonna do top and back.
Then do the parts.
 |
Day 12- 2/1/15
okay, I think front and side are no longer a
problem. working on the underside; I think I just about have it. (now just
top and back)
also worked on the 'muzzle' area. last will be the dome of the skull. 3 shapes of the head:
-Shape of the jaw:
It is like a V (male more U), seen from below. depending on how far the chin juts out, it can either allign with the teeth/upper lip/forehead, or fall back a bit. the 'U' shape of the lower teeth is smaller then the total V of the lower jaw (2/3). they move up straight at the base, where the connection to the eye socked moves outward a bit. the lib in front of the jaw's hinge curves outward pretty strongly, reaching out towards the cheekbone's outside. -Shape of the muzzle: The upper teeth form a horse's iron. the are of the upper lip to nose forms a hoof. the hoof tilts down, making its front line a vertical. the hoove's length twise up from the back reaches the position of the outer eyesocket's top. the triangle reaches down again to the front of the teeth. from the half-way point the cheekbones extent from the nose, near straight angles inside, but curving round at the front. the nose cuts into the front of the triangle at ablt 30 degrees. -Shape of the dome: An egg, somewhat pushed in to be flatter at the top. there is an indent where the muzzle starts. and some 'ridges'for the cheekbone and eyesocket's outside to attach to. seen straight from the bottom, there is a hole 1/4 from the back to near 1/2. the area where the hole originates is extended somewhat, until the fall in for the muzzle starts. 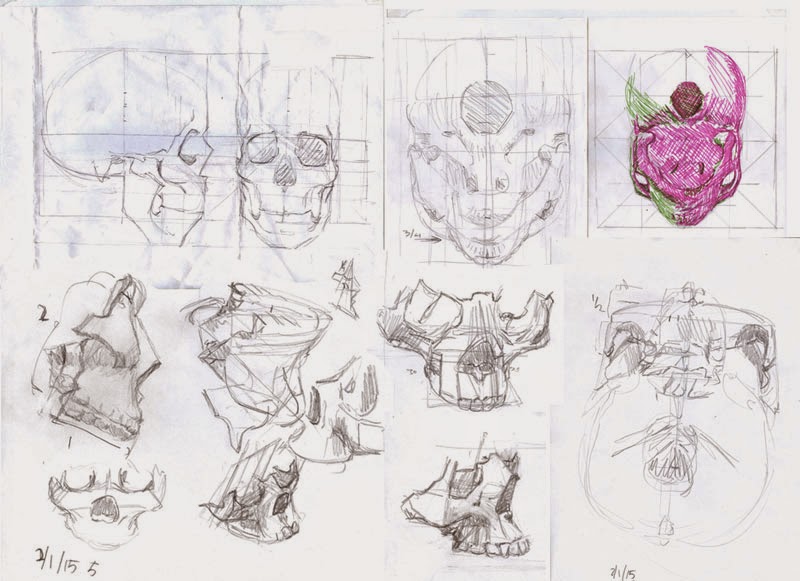 |
Day 13- 3/1/15
Memorized underside. Working on
back&top.
Got the last shape mapped out.
Tried another free turning.
Will do some last ones
tomorrow.
 |
Day 14- 4/1/15

-I have now successfully memorized
all views, and 3 shape masses.
-I didn’t have a definition of
done yet, so I wrote one out:
Goal can be demonstrated in
its usual context and to a reasonable degree out of context. i.e., applicable
in the exercises as done during the project, but also applicable for a
portfolio piece.
Drawing 1.1 (skulls)
SKULLS: (low level features/deliverables?)
-inventory how many more. (from ref, from no-ref) 1p DONE(26/12)
-get measurements right, from life-skull. Side 2p (DONE(27/12)
get measurements right, from life-skull. FRONT 2p(DONE 28/12)
-get measurements bottom 2p
(DONE 02/01)
Get measurements top 1p
(DONE 3/1/15)
Get measurements back 1p
(DONE 3/1/15)
-make shape simplification. 4p
(DONE 3/1/15)
-memorise measurements and check by drawing. (front/side) 12p (DONE 1/1)
-memorise measurements bottom, top, back 6p (DONE
4/1/15)
-memorise simplifications 12p
(DONE 4/1/15)
-finish remaining skulls using measurement and line quality. 30 DONE ON 04/01/2015 (of 59)
Points done: 71
|


SKULLS: (low level features/deliverables?)
-inventory how many more. (from ref, from no-ref)
-get measurements right, from life-skull. Side
-get measurements right, from life-skull. FRONT
-get measurements bottom
-get measurements top
-get measurements back
-make shape simplification.
-memorise measurements and check by drawing. (front/side)
-memorise measurements bottom, top, back
-memorise simplifications
-compare measurements and simplification to literature
-check skull-to-face positions.
-re-read line quality piece.
-finish remaining skulls using measurement and line quality.
|
1p
2p
2p
2p
1p
1p
4p
12p
6p
12p
4p
4p
1p
59p
|


